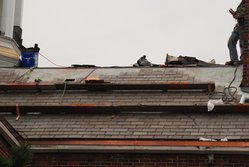
One of the most dreaded days in the life of a homeowner is the day when that brown patch or spot shows up on a ceiling or in the corner of a room. The first signs of a leaking roof are small, but you can’t miss them. And you know that when you first see it, it is a problem that will not go away by itself.
Many times the leaks in your roof are not directly above the spots where they show up on your ceiling. Fixing a leaking roof can sometimes take a good deal of detective work on your part. The water that leaks in under or through the shingles may run down rafters or your chimney and then show up in your ceiling at a different location. But before you start looking for the leak, decide whether or not it is time to replace all your shingles, or just fix the spot that is leaking.
Do You Need A New Roof?
If your asphalt shingles are getting to be more than 15 or 20 years old then it may be time to put on a new roof. If your shingles appear very worn and you see areas that are buckling or cracking, or if you see lots of granules from the shingles in your rain gutters and the shingles look old or threadbare, then it may be time to simply put on a new roof.
If your home is fairly new, you can put a new layer of shingles right on top of the old ones. If this is the case you can save a good deal of money on your roof replacement cost. On most homes, you can put as many as three layers of shingles on the roof before they have to be completely torn off.
If you already have two or three layers of shingles on the roof, then the job becomes more complicated since it will be necessary for you to tear off the old shingles completely before putting on the new ones. If this is the case, be sure to look for and repair any of the roofing materials or boards that show water damage or rotting before you put on the new roof.
If Your Existing Shingles Are Good, Here’s How to Fix the Leak:
If you can fix your leak you can save yourself the cost of a new roof. The first thing you need to do is determine where the water is getting through the roof. Go up in your attic with a good flashlight and try to determine where it is leaking. Look for signs of water; discoloration, dampness or moldy spots. Pay special attention to areas where there is flashing above you on the roof such as where your chimney or other plumbing vents go up through the roof.
Once you find the spot where the water is getting in, go outside and get up on the roof to find the spot from the outside. If the spot is hard to locate on the outside, you can pound a nail through the roof from the inside so you can find the area to fix.
If the leak is due to problems with loose flashing around a chimney or vent, use rust proof screws to tighten and secure the flashing. Then apply roofing tar over the area you have repaired. You can check out the roof repair products on this page if you need help getting the right materials.
If the problem is caused by a bad shingle or shingles, you can replace the ones that are bad. It is not necessary to completely redo the roof if you only need to replace a few shingles. If you find shingles that are damaged and cracked that you think are the cause of your leak, be sure to replace a somewhat larger area around them to make sure you have the problem fixed.
It is not a difficult job to lift up the top row of good shingles, and then cut out and replace the bad ones. If you need to leave any exposed nails, be sure to cover them well with roofing tar. Make sure that you don’t leave any areas where water can stand or pool.
Get Help If You Need It:
If you don’t feel comfortable doing roofing repairs yourself, call a roofing contractor for help. But if you take the time to figure out where your leak is, and what the extent of the problem may be, you’ll be better prepared to talk to them.
And once you find the leak and know the problem, you may want to take a stab at it yourself and save much of that new roof cost for yourself. And remember that if your project turns into a job where you generate a lot of rubbish or debris, check out our pages on how to save money by renting a roll off container or roll off dumpster to make a simple job of cleanup.
If Your Roof Leaks Through Your Asphalt Shingles Don’t Panic, Here’s What To Do
One of the most dreaded days in the life of a homeowner is the day when that brown patch or spot shows up on a ceiling or in the corner of a room. The first signs of a leaking roof are small, but you can’t miss them. And you know that when you first see it, it is a problem that will not go away by itself.
Many times the leaks in your roof are not directly above the spots where they show up on your ceiling. Fixing a leaking roof can sometimes take a good deal of detective work on your part. The water that leaks in under or through the shingles may run down rafters or your chimney and then show up in your ceiling at a different location. But before you start looking for the leak, decide whether or not it is time to replace all your shingles, or just fix the spot that is leaking.
Do You Need A New Roof?
If your asphalt shingles are getting to be more than 15 or 20 years old then it may be time to put on a new roof. If your shingles appear very worn and you see areas that are buckling or cracking, or if you see lots of granules from the shingles in your rain gutters and the shingles look old or threadbare, then it may be time to simply put on a new roof.
If your home is fairly new, you can put a new layer of shingles right on top of the old ones. If this is the case you can save a good deal of money on your roof replacement cost. On most homes, you can put as many as three layers of shingles on the roof before they have to be completely torn off.
If you already have two or three layers of shingles on the roof, then the job becomes more complicated since it will be necessary for you to tear off the old shingles completely before putting on the new ones. If this is the case, be sure to look for and repair any of the roofing materials or boards that show water damage or rotting before you put on the new roof.
If Your Existing Shingles Are Good, Here’s How to Fix the Leak:
If you can fix your leak you can save yourself the cost of a new roof. The first thing you need to do is determine where the water is getting through the roof. Go up in your attic with a good flashlight and try to determine where it is leaking. Look for signs of water; discoloration, dampness or moldy spots. Pay special attention to areas where there is flashing above you on the roof such as where your chimney or other plumbing vents go up through the roof.
Once you find the spot where the water is getting in, go outside and get up on the roof to find the spot from the outside. If the spot is hard to locate on the outside, you can pound a nail through the roof from the inside so you can find the area to fix.
If the leak is due to problems with loose flashing around a chimney or vent, use rust proof screws to tighten and secure the flashing. Then apply roofing tar over the area you have repaired.
If the problem is caused by a bad shingle or shingles, you can replace the ones that are bad. It is not necessary to completely redo the roof if you only need to replace a few shingles. If you find shingles that are damaged and cracked that you think are the cause of your leak, be sure to replace a somewhat larger area around them to make sure you have the problem fixed.
It is not a difficult job to lift up the top row of good shingles, and then cut out and replace the bad ones. If you need to leave any exposed nails, be sure to cover them well with roofing tar. Make sure that you don’t leave any areas where water can stand or pool.
Get Help If You Need It:
If you don’t feel comfortable doing roofing repairs yourself, call a roofing contractor for help. But if you take the time to figure out where your leak is, and what the extent of the problem may be, you’ll be better prepared to talk to them.
And once you find the leak and know the problem, you may want to take a stab at it yourself and save much of that new roof cost for yourself.
One of the most dreaded days in the life of a homeowner is the day when that brown patch or spot shows up on a ceiling or in the corner of a room. The first signs of a leaking roof are small, but you can’t miss them. And you know that when you first see it, it is a problem that will not go away by itself.
Many times the leaks in your roof are not directly above the spots where they show up on your ceiling. Fixing a leaking roof can sometimes take a good deal of detective work on your part. The water that leaks in under or through the shingles may run down rafters or your chimney and then show up in your ceiling at a different location. But before you start looking for the leak, decide whether or not it is time to replace all your shingles, or just fix the spot that is leaking.
Do You Need A New Roof?
If your asphalt shingles are getting to be more than 15 or 20 years old then it may be time to put on a new roof. If your shingles appear very worn and you see areas that are buckling or cracking, or if you see lots of granules from the shingles in your rain gutters and the shingles look old or threadbare, then it may be time to simply put on a new roof.
If your home is fairly new, you can put a new layer of shingles right on top of the old ones. If this is the case you can save a good deal of money on your roof replacement cost. On most homes, you can put as many as three layers of shingles on the roof before they have to be completely torn off.
If you already have two or three layers of shingles on the roof, then the job becomes more complicated since it will be necessary for you to tear off the old shingles completely before putting on the new ones. If this is the case, be sure to look for and repair any of the roofing materials or boards that show water damage or rotting before you put on the new roof.
If Your Existing Shingles Are Good, Here’s How to Fix the Leak:
If you can fix your leak you can save yourself the cost of a new roof. The first thing you need to do is determine where the water is getting through the roof. Go up in your attic with a good flashlight and try to determine where it is leaking. Look for signs of water; discoloration, dampness or moldy spots. Pay special attention to areas where there is flashing above you on the roof such as where your chimney or other plumbing vents go up through the roof.
Once you find the spot where the water is getting in, go outside and get up on the roof to find the spot from the outside. If the spot is hard to locate on the outside, you can pound a nail through the roof from the inside so you can find the area to fix.
If the leak is due to problems with loose flashing around a chimney or vent, use rust proof screws to tighten and secure the flashing. Then apply roofing tar over the area you have repaired. You can check out the roof repair products on this page if you need help getting the right materials.
If the problem is caused by a bad shingle or shingles, you can replace the ones that are bad. It is not necessary to completely redo the roof if you only need to replace a few shingles. If you find shingles that are damaged and cracked that you think are the cause of your leak, be sure to replace a somewhat larger area around them to make sure you have the problem fixed.
It is not a difficult job to lift up the top row of good shingles, and then cut out and replace the bad ones. If you need to leave any exposed nails, be sure to cover them well with roofing tar. Make sure that you don’t leave any areas where water can stand or pool.
Get Help If You Need It:
If you don’t feel comfortable doing roofing repairs yourself, call a roofing contractor for help. But if you take the time to figure out where your leak is, and what the extent of the problem may be, you’ll be better prepared to talk to them.
And once you find the leak and know the problem, you may want to take a stab at it yourself and save much of that new roof cost for yourself. And remember that if your project turns into a job where you generate a lot of rubbish or debris, check out our pages on how to save money by renting a roll off container or roll off dumpster to make a simple job of cleanup.
If Your Roof Leaks Through Your Asphalt Shingles Don’t Panic, Here’s What To Do
One of the most dreaded days in the life of a homeowner is the day when that brown patch or spot shows up on a ceiling or in the corner of a room. The first signs of a leaking roof are small, but you can’t miss them. And you know that when you first see it, it is a problem that will not go away by itself.
Many times the leaks in your roof are not directly above the spots where they show up on your ceiling. Fixing a leaking roof can sometimes take a good deal of detective work on your part. The water that leaks in under or through the shingles may run down rafters or your chimney and then show up in your ceiling at a different location. But before you start looking for the leak, decide whether or not it is time to replace all your shingles, or just fix the spot that is leaking.
Do You Need A New Roof?
If your asphalt shingles are getting to be more than 15 or 20 years old then it may be time to put on a new roof. If your shingles appear very worn and you see areas that are buckling or cracking, or if you see lots of granules from the shingles in your rain gutters and the shingles look old or threadbare, then it may be time to simply put on a new roof.
If your home is fairly new, you can put a new layer of shingles right on top of the old ones. If this is the case you can save a good deal of money on your roof replacement cost. On most homes, you can put as many as three layers of shingles on the roof before they have to be completely torn off.
If you already have two or three layers of shingles on the roof, then the job becomes more complicated since it will be necessary for you to tear off the old shingles completely before putting on the new ones. If this is the case, be sure to look for and repair any of the roofing materials or boards that show water damage or rotting before you put on the new roof.
If Your Existing Shingles Are Good, Here’s How to Fix the Leak:
If you can fix your leak you can save yourself the cost of a new roof. The first thing you need to do is determine where the water is getting through the roof. Go up in your attic with a good flashlight and try to determine where it is leaking. Look for signs of water; discoloration, dampness or moldy spots. Pay special attention to areas where there is flashing above you on the roof such as where your chimney or other plumbing vents go up through the roof.
Once you find the spot where the water is getting in, go outside and get up on the roof to find the spot from the outside. If the spot is hard to locate on the outside, you can pound a nail through the roof from the inside so you can find the area to fix.
If the leak is due to problems with loose flashing around a chimney or vent, use rust proof screws to tighten and secure the flashing. Then apply roofing tar over the area you have repaired.
If the problem is caused by a bad shingle or shingles, you can replace the ones that are bad. It is not necessary to completely redo the roof if you only need to replace a few shingles. If you find shingles that are damaged and cracked that you think are the cause of your leak, be sure to replace a somewhat larger area around them to make sure you have the problem fixed.
It is not a difficult job to lift up the top row of good shingles, and then cut out and replace the bad ones. If you need to leave any exposed nails, be sure to cover them well with roofing tar. Make sure that you don’t leave any areas where water can stand or pool.
Get Help If You Need It:
If you don’t feel comfortable doing roofing repairs yourself, call a roofing contractor for help. But if you take the time to figure out where your leak is, and what the extent of the problem may be, you’ll be better prepared to talk to them.
And once you find the leak and know the problem, you may want to take a stab at it yourself and save much of that new roof cost for yourself.
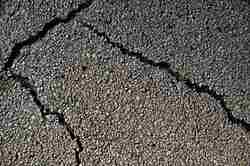
Asphalt is a great product for the driveway of your home. Ideally it lasts for many years and is mostly maintenance free. But we don’t live in an ideal world and even the highest quality asphalt suffers under attack from the sun, wind, rain and freezing weather.
After your asphalt driveway gets to be a few years old you begin to see the effects of this deterioration. Small holes and cracks will appear. Water seeps into these where it freezes over the winter expanding and making larger cracks and holes. If you don’t fix these problems it doesn’t take many more years before chunks start to break off from the corners and sides. At this point it is beyond repair and you either have a very large expense staring you in the face or, if you are thinking of selling your home, have seriously lowered it’s selling value in the eyes of potential buyers.
Most people don’t realize how easy it really is to do minor fixes to your driveway and reseal it to refresh the surface and keep water out. This is an easy one day project. Here are the tools you will need:
* Medium to Large Push Broom or Large Foam Mop
* Garden hose and nozzle (or to make things really easy, a pressure washer)
* Small trowel or putty knife.
* Small shovel (or grass edger)
* Gloves and rags to protect your hands and for cleanup.
As you can see, you already have all the tools you need in your garage. Now you need your sealing and fixing materials. You can order these products online or find them at your nearest Home Depot or Lowes. You’ll need:
* Asphalt Driveway Sealer (usually comes in five gallon pails which will cover approximately 500 square feet). Determine the total square footage of your driveway and buy enough to cover. If it has been many years since your driveway has been sealed, pick up a little extra because the older, drier asphalt will soak up more than normal.
* Asphalt Driveway Crack and Hole Filler (typically is sold in three pound containers). Get the amount you need based on the number of cracks and holes you need to repair.
* Sand to fill deep holes or cracks if you have them.
Here’s how to get the job done. It isn’t hard, doesn’t take hours and hours, and by going step by step you’ll be done in no time.
1. Clean off all the dirt, grass or weeds that are on the driveway. If you have a lot of grass or weeds growing in the cracks you may want to spray these with a weed and grass killer a week or two ahead of time which will make it easier to get them cleaned out. Use a trowel or putty knife to dig out as much of the dirt and debris as possible from any cracks or holes. Use your lawn edger or a shovel or spade to go along the edges of the driveway and cut away any grass or dirt. Make sure you have clean edges along the entire length and that all dirt and debris is removed from the cracks and holes. Then use your broom to sweep the driveway as clean as possible.
2. Wash the driveway off completely. If you have access to a pressure washer this is an ideal way of cleaning the surface. Use it to clean the surface completely and to blow out any dirt you can from the cracks and holes. If you are using a garden hose, attach a nozzle to the end to give you the highest pressure possible. By doing a good job of cleaning now, you may save yourself a few years before you need to reseal again because you are doing an excellent job now.
3. Let the driveway dry completely and check for contaminants. As it’s drying watch for spots or areas that shine or appear dull from oil or other contaminants that have spilled on the driveway. Get a bucket with water and mix with a cleaner such as 409. Wash these spots off by scrubbing with your broom or a brush. You probably won’t be able to remove the foreign material completely, but the cleaner will help make a better surface for your sealing compound to adhere to. Rinse these areas off completely after you finish cleaning them.
4. Fill any cracks or holes with Asphalt Filler. If the holes or cracks are deep, prep them by using sand to fill them nearly to the top. Then use your hose to wet these down completely to let them settle leaving them approx 1/2″ deep. You may want to do this two or three times, waiting an hour or two between each soaking. Allow the driveway to dry completely before using the crack filler. Apply the filler according to the directions on the container, but it is important to make sure you get it deeply into any cracks or holes and make sure you smooth the top for a nice finished look. Wait for the filler to dry and reapply another coating if cracks reappear.
5. Apply the driveway sealer. Now that you have all the difficult preparatory work completed, this will seem like the easy part. The ideal situation is to pick a warm cloudy day. This will allow the sealer to flow on smoothly without drying too fast. Pour a moderate amount of sealer onto the driveway and spread it out evenly with your broom or foam mop. When you have a workable area done, pour out more and keep going. You should follow the directions on the container for the product you are using, but once you get started you’ll get a feel for how much sealer you need to get a nice even coat. (If it has been many years since your driveway has been sealed you may want to apply two coats.) Rope off the driveway to make sure no one walks or drives on it until it is completely dry.
And that’s all there is to giving yourself a brand new looking beautiful driveway! This is one job that really gives you a good sense of well being and payback since you see the results of your work every time you come home and drive into the garage. Put a smile on your face and add value to your home by taking these simple steps to take care of your driveway.
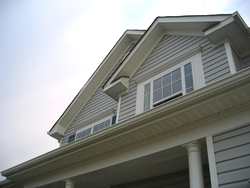
There are many quick and easy tasks that you can do to keep your home looking good and maintain it’s value. But often it is easy to ignore or neglect these tasks since they seem trivial and of negligible value. And one of these seemingly unimportant jobs is maintaining the rain gutters on your home.
Installing rain gutters on your house and keeping them clean and in good shape has a number of advantages. It seems obvious that your house is outside in the weather. While that is true, rain gutters and eave troughs really can protect your home. They do this by keeping the majority of the rain off your exterior siding or masonry and by routing the rainwater out and away from your foundation.
Rain running off a roof without gutters onto concrete driveways and walks can pit out and gouge a channel in a matter of just a few years. And if you don’t have rain gutters the large amount of water coming off your roof and falling right next to the foundation of your house will cause settling of the ground near the foundation. This will cause the thousands of gallons of water that fall on your roof each year along with the water around your house to seep down next to your basement walls.
If you live in a climate where it freezes in the winter, this is an especially troublesome problem since the expanding and contracting of this supersaturated frozen ground is one of the main causes of foundation cracks and basement wall problems.
If you don’t have rain gutters on your home, it is easy to install them. The vinyl rain gutters available today at local home improvement stores are fairly quick and easy to put up. You can find gutter contractors do your rain gutter installation and some of these offer seamless rain gutters which is a nice feature. But if you want to do it yourself this is a project well within the reach of anyone with a little DIY skill and can be done over a weekend. If your installation project generates a lot of trash or if you do a general clean up of your property at the same time, check out our information about roll off containers and roll off dumpsters to use to get rid of the debris.
Then it is simply a matter of maintaining the gutters by cleaning them twice a year, spring and fall, and you’ll add years to the life of your home. When you clean the gutters, remove all the debris you find inside. Check the openings where the downspout connects to make sure that it isn’t plugged and that the water can run freely.
Repair any broken or loose gutters and make sure that you have the proper slope for drainage. A drop of approximately one inch per each 20 feet of run works well. Fix any leaks or holes that you find with gutter sealant. You can get gutter and flashing sealant in tubes that fit your caulking gun. This is a quick and easy way to fix small problems and keep everything in good repair.
If you have a lot of leaves in your yard that create frequent plugging problems for you, it’s possible to keep them out of the gutters by using gutter screen to keep the majority of them out. There are also several new products that use a porous foam filler or brush type material that you place in your eave troughs that fill the space and keep leaves and debris out, but allow the water to run through.
By taking a few hours each year to inspect and clean your rain gutters you’ll take away years of wear from your home’s siding and masonry along with helping to keep your basement dry. It’s a quick and simple do it yourself project with a big payback for the little time it will take you to do it.
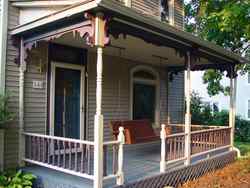
Decorating and fixing up the inside of our house is fun and adds to our overall enjoyment of living in our home. And while it is good to keep things up and make improvements on the inside, we sometimes forget that the outside of our home needs attention and maintenance as well. It’s important that we spend the time to take care of exterior items to preserve the good looks and value of our homes.
The outside of your home is the only part of it many people will see. People who pass by, neighbors and others who see your home judge it by how it looks from the outside. By doing a good job of maintaining your property you increase it’s value and ‘curb appeal’.
Our homes are getting a little older every day. The exterior siding, paint, trim, doors, masonry, foundation and roof are constantly attacked by the sun and weather. When we are sitting inside our home we don’t see and sometimes forget about how the outside looks. And because changes to the home exterior happen slowly, we typically don’t notice the slow deterioration and decline in the look of our home.
But it is easy to slow and even halt this process by taking steps each year to keep your home looking in tip top shape.
In this section are a number of ways to help you easily take care of the outside of your home. This is an excellent resource for you to use as a checklist for the things to do each year or as individual items to give you tips if you need help for a particular task. And remember to check out our pages about home and yard cleanup as well.
And if you are doing a project that will generate trash and debris such as exterior home remodeling, be sure to take a look at our sections on using and renting roll off containers to make clean up easy for you. Many home improvement products produce trash and tear out items that you can’t dispose of in your regular garbage. This is often a problem in today’s ecologically minded world and the best way to stay green and get rid of your problem at the same time is to do a one time rental of a roll off dumpster or rolloff container.
By planning out a little time, and doing a exterior home inspection and walk through annually, you can improve the appearance of your home, be more comfortable inside and save yourself money on utility bills, and maintain your home’s value for the future.
But you will quickly find out that it is a lot easier to go out and buy the new materials you need than it is to get rid of the old that you tear out.
The most common and cost effective way to get rid of this debris for any job that will produce more than the smallest amount of torn out material is to rent a roll off container. Roll off containers, or ‘rolloffs’ as they are commonly referred to in the trade, are like a large one time use dumpster that you can fill will any and all types of trash. When you are finished, the roll off container company will come and haul it all, the container and the debris, away.
Will a roll off container company work with me and how do I get the size I need?
This is the first questions many people ask when thinking about the need for a rolloff. There are standard sizes that are used in the industry and these sizes are called out in cubic yards. The most common sizes used by the do it yourself remodeler are the 10, 20 and 30 cubic yard varieties.
When you talk to a representative of a roll off container company they will, however, speak in terms of a ’20 yarder’ or ’30 yarder’. This is the vernacular of the trade and it is the way the sizes are expressed.
It is good to have some idea of the size you need prior to your call. This allows you to discuss ordering a rolloff and you can quickly and easily learn more about what you need. You will want to get the pricing and any information or rules they have about restricted materials without you having to ask (pardon me) a lot of ‘dumb’ questions.
What is the amount common dumpster sizes actually hold?
A cubic yard is an area that is 3 feet long by 3 feet wide by 3 feet deep. To get some idea, compare the size you need to this imaginary small one car garage. Our imaginary small one car garage (comparable to sizes of storage rental units) is sized at 14 ft wide by 22 ft deep by 8 (usable) ft high. A small building of this size would contain 100 cubic yards of space.
So when determining dumpster sizes that you want to consider how large of a roll off container you might need based on the amount of tear out material and waste you will have from your project.
10 yarders are quite small and would probably only be adequate for a very small project such as redoing the flooring in a bathroom or very small room.
20 yarders start to become the size you might want to consider for other smaller projects. They contain the space comparable to going back only a little more than 4 ft into our imaginary garage. But if you won’t have a lot of sheet rock or lumber to get rid of, this is a good starting size.
30 yarders start to get big enough to handle a larger project such as changing a wall or tearing out cabinets in rooms larger than bathrooms.
And if you really need the space a 40 yarder will give it to you. This would be like having the room to fill up our imaginary small garage nearly halfway full to the roof with debris.
And as a final word of advice, try not to cut it too close and order a rolloff that will end up being too small. If you are in doubt, go to the next larger size. It always seems that there is more to throw away than you think of. And if you get to the end of your project and find you have unused room in your rolloff, first of all be happy because this means you won’t have to call and have it emptied and then another returned for additional charges. Then look around and get rid of any other long lost trash or debris that would be hard to get rid of in any other way.
Good luck with your project! The last thing you will do is to call the roll off container company and let them know they can come and get their container. It’s a great call to make.